Please help me in welcoming Leigh to YHOB again! He did such a great job with his last post, I asked him to share his latest DIY furniture restoration project (from his honey-do list). Thanks Leigh!
This is a story of how an abandoned drop leaf table was given a second life with a little paint, wood filler and elbow grease.

It started with my wife getting a text from a friend that an old drop leaf table had been sent to the curb in her neighborhood and was in need of rescue. She knew my wife would take it in. She’s a softy for furniture in need. So after work we drove over, decided it was worth a second chance, and loaded it into our minivan. The past owner waved and wished us luck.

After “rescuing” the table, I began to assess its condition and potential. It was solid oak, with traditional glued plank construction on the top and legs. One of the drop leaves was detached, and the table surface was covered in long scratches. Unfortunately the area around the scratches has also been discolored, either by oil or water. My guess is that the table had either been used as a chopping block or to rebuild engines. Maybe both.
We decided that the best option was to sand it smooth, stain or paint it, and use it as a side table at parties or holiday dinners. It has a great size, easy to move, and the drop leaves come in handy when you have limited space.

I started cleaning the top with a commercial liquid stripper to reduce sanding and to quickly determine the depth and prevalence of the scratches, which covered the top. The legs were in better shape and could be refurbished with a light sanding and repainting.

Removing 2 coats of old paint revealed a top covered in tiny surface scratches. Starting with a 60 grit sandpaper, I was able to remove most of the major gouges, but some of the discoloration remained. At this point I decided to follow up with successive sandings of 160, 220, and 300 grit paper. Once again, no magic to these choices – they were simply what I had in the shop.

It was also at this point that we decided it would take too much additional sanding to get the top ready for staining, so we opted instead for a deep red paint with a satin finish. We chose a brand with built-in primer. I can’t really say that it eliminated any time or filled any scratches, but it was worth a try.

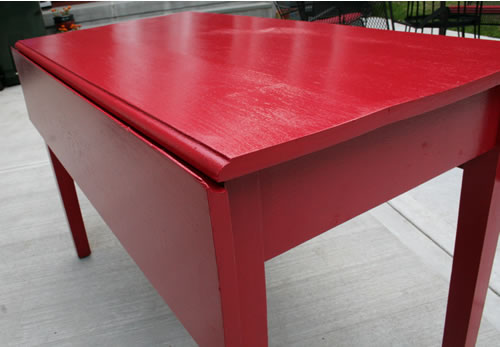
We chose a deep red, almost a rose color, in order to match the decor of our sunroom. This is where the table resides between parties. Initially the first coat looked pink, and I was concerned that the color wasn’t mixed correctly. Another coat brought it closer to the paint chip, and successive coats revealed the true deep red.

The top also had a few blemishes, including a gap in the seam between two of the boards. A corner was dented and scraped, probably as it was being taken to the curb. Some commercial wood filler applied with a putty knife, followed by gentle sanding and forming, eliminated these problems.

The legs were solid and required only light sanding. I removed the drop leaves to properly paint the table and leaf edges. I also installed new plastic feet with a rubber cushions.

Before I applied the last coat of paint, I gave it a final sanding with 600 grit paper, to minimize any brush marks from prior coats. The satin finish is perfect to hide the scratches that will undoubtedly occur during seasons of use.

I would call this table a “10 footer” – that is, it looks great from 10 feet away. Despite my best efforts, it still has some brush marks, and there is some minor warping in the top.
That said, for the cost of a quart of paint, liquid surface stripper and some sandpaper, we now have a great stowable table to use for holiday dinners, drinks and side dishes during summer barbecues.

This was a project completed during my spare time over a couple of weekends and 2 or 3 evenings. I never spent more than 2 hours on it at any given time. The sanding and coats of paint accounted for the majority of the effort.
Thanks again honey! I’ll keep my eyes on the curb for our next collaboration! 😉


4 comments
Amazing work. From curb to Superb is just too good… Keep it up..!
Thanks for the post. The furniture enhances the interior look. They must be the well padded and comfortable.
I’m a lucky girl! 🙂
OHHH beautiful job Leigh. That Susan keeps you knee deep in some great looking projects…that’s what wives are for. Can’t wait to see what’s next!!