A good friend of mine has HAD IT with her kitchen.
While she dreams of a major renovation (don’t we all) she is motivated to (with a limited budget) do something about it NOW. She entertains family at the holidays, and would love to make some quick and smart updates to her kitchen before then.
I think we can all relate to that!
So, let’s get started! I’m going to post some “before” pictures here, and look forward to hearing your suggestions.
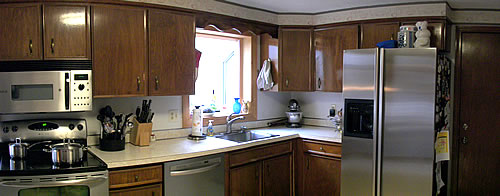
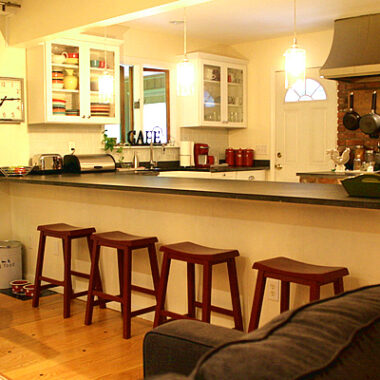
First, a couple panoramic views:


And here are a couple close up shots:


Now let’s have some fun…if this was YOUR kitchen and someone gave you $500 to spruce it up, what would YOU do? Don’t be shy…if she wants to get this done by Christmas, she needs to get busy soon! And yes, she’s promised to post “after” pictures for us to drool over.
Thanks for you help!


18 comments
Your post sucks. Mines better! ..lol. Just kidding.
Just getting into this blogging thing myself, though I don’t think anyone actually reads my posts. Does it come easier with time?
Nice post!!! Buy windows Des Moines for your loving home. America’s Best Choice provide all type windows attractive and strong at very affordable price.
If you like to make your new home looks fancy and outstanding, then you should really consider including more shimmering and sparkling home unit. Besides living room furniture, you should insert items like mirror, bookcase or magazine rack that definitely make your rooms look lively and energetic.
fantastic job. I did not anticipate this. This is a excellent story. Thanks!
Just do the face of the cupboards, paint light soft color, instead of the steel rack you could put a pantry cupboard. new couter top (just face it) look at menards, lowes for a some cuboard with countertop and few stools to go underneath for seating instead of table and chairs – this would also give you more work space in kitchen. Hope that helps
paint the cupboards, change the door knobs and get rid of the open pantry or put stuff in coordinated baskets/containers
We just did this.
1) paint all cabinets a beautiful steel blue (ours is behr Catalina coast) about $30
2) get new hardware for cabinets
3) buy new window treatments. We had a famous window treatment company come and give us a free designer consultation, then I bought something similar (and cheaper) on overstock.com $45
4) replace the floor. We went to a reclaimed building supply store that funds habitat for humanity projects and bought our tiles and sink. Home Depot tiles: $1.75 each. Ours $0.15… same brand and style. Home depot cast iron sink: $450 Ours: $40… was pulled from a remodeling job, but it is huge and gorgeous and i loved the price.
5) rather than replace light fixtures, we spray painted the old gold a satin nickel to match the new cabinet hardware. $10
paint $30
spray paint $10
window treatment $45
sink $40
hardware: 100
tiles: $150 Plus grout etc: $200
We decided to splurge and replace the lower cabinets, get a new counter top, install a new light and add a chair rail, so in the end we kept it under $5000
If this was my kitchen, here is what I would do:
1) Paint cabinets. Paint is the least expensive option but has the greatest impact. If you decide to keep your existing counter, I’d choose a color that complements the color of your counter. I would also paint the french door in the same color. I would also change the hardware on the cabinets.
2) Remove the wallpaper border above the cabinets. Paint the walls – I’m partial to cooler colors, but a nice neutral would work well. Depending on how much light you get in the room & the color you choose for the cabinets….this would influence my decision on what color to choose for the walls.
3) Remove the curvy wooden lip above the window. This will open the window up and let more light in.
4) Remove the steel framed shelving unit – too much clutter. Perhaps after re-organizing your cabinets, you’ll find extra room to store pantry items.
5) Remove the wall organizers on the blank wall. Depending on depth, I’d think about putting open shelving on the bare wall above the small kitchen table. I would use this to store dishes, glasses, vases, etc. Not too dissimilar from this: http://1.bp.blogspot.com/_TatPpSnJCYc/TNvkDvN-U4I/AAAAAAAAIvk/LXyJRKF9jFk/s1600/kithcenfridgecp.JPG
6) I would also think about removing the kitchen table and instead using an island of sorts that could be pushed up against the wall. You could use that as extra counter space or even have a bar stool or two (to the side) so people could sit and have coffee, etc.
Something like this: http://www.crateandbarrel.com/furniture/dining-kitchen-storage/french-kitchen-island/f34455 (but less expensive, obviously)
7) Consider different flooring. There is laminate wood planks you could use to get a hardwood look. Or find a nice area rug (inside/outside) rug to cover up the flooring.
8) Lastly, I would de-clutter. Take all the stuff off the window sill, top of the fridge, etc. I would take a look at what you have and consider do you need 2 coffee machines on the counter?
Well, I hope this adivce helps! So exciting! Good luck and I can’t wait to see after pictures!!
Fran
http://greenstreetblog.blogspot.com
Making great progress…will share final design plan soon, and hopefully “after” pics by Xmas! Btw – she used many of your ideas!
Have you finished this project yet Susan? Really looking forward to seeing what you do with it.
Susan…due to my inability to concentrate on the kitchen because it was football Saturday in my house…I finally arrived and can easily now just write “ditto” as Judy Colburn read my mind and hit upon most all of the suggestions I would have. My first reaction was to the clutter. I think that in and of itself would weigh heavy on anyone entering the room, especially the homeowner. I have NO appliances on my counter tops except for my coffee maker. There are AMAZING products for use in cabinets now that allow for storing items and making them easily accessible. On top of everything Judy already suggested, the only other thing I would add is that something be done with those cords…I’m guessing that is her phone and answering machine on the left hand side of the kitchen. Maybe some kind of a shelving unit would work there for a way for her to “hoist” that which needs to be plugged in without the dangling cords? I hide my phone behind a recipe book holder in the kitchen…I can not stand the site of cords…I know…it’s a serious issue with me. I think the kitchen has SO much potential. I wish her lots of luck but most of all FUN and creativity so that she may have a kitchen, which we all know is the HEART of the home, which makes her proud to entertain. Can not wait for the after photos. : )
paint the cabinets and get new hardware – we did this and it totally changed our kitchen overnight…inexpensive and a bit time consuming but totally worth it…
Here’s what I would do:
1) Go through all your cabinets from top to bottom and get ride of anything you don’t need or no longer use and rearrange the remaining contents to create some more storage space.
2) From these pictures, the cabinets look like they are in good condition. If so and you like the color, I would clean them and then wash down with orange oil. Buy brushed/satin nickel hardware (unless the existing hardware is nickel – can’t tell from the pictures) but all your metals should match. Note: I would remove the wooden valance over the sink to create a more up-to-date look.
If you don’t like the cabinets, try re-staining or paint them. If the room is dark, go for a light color (I suggest Sherwin Williams Basketry. Take the color swatch and have the paint store make it for you in Behr’s Ultra Paint and Primer (available at Home Depot) and save time on using a separate paint and primer – the Behr product is fantastic). If there’s lot’s of light you could opt for an espresso or dark chocolate).
4) I would remove the wall paper border and paint the walls in SW Plateau (again, take the swatch to Home Depot and have them make it in the Behr paint and primer).
5) After the cabinets have been sorted through, put all of the small appliances not used daily, knife block and paper towel roll in the cabinets and out of sight.
6) Remove the storage rack from the room. Place it in a closet or basement and keep bulk and occasionally used items on it.
7) Clear off the top of the fridge and remove all the magnets and artwork on the sides.
8) Relocate your message center to an out-of-sight or less noticeable spot and place a nice piece of artwork on the wall.
9) Take out all the items in the window and put 1-3 healthy green plants in it.
10) With the remaining funds, I would purchase a small dining table and 4 chairs in a more updated style to match the “new” kitchen.
I think your kitchen has good bones and $500 should go a long way in helping you achieve the look you want. Honestly, just decluttering and painting the walls will change the entire look but the remaining details will make it yours.
Good luck with you project. Looking forward to the after pics!
Ooh, fun. I’m going to post my suggestions before looking at anyone else’s so I’m not influenced by their totally awesome ideas.
1. Paint the cabinets. I think it would be fun to do white uppers and light beige-ish gray lowers. It’s hard to tell what the hardware looks like. It might be fine as is, otherwise, paint that too. If there’s time, I’d paint the table and chairs as well. Also paint the trim in the room (and the door).
2. Get rid of the wallpaper border.
3. Paint the walls. I’d keep it light, since it looks like there’s a red dining room next door to content with.
4. Clutter patrol! As long as you’re painting the cupboards, clean them out. Think long and hard about what you keep in them, and anything that’s not used at LEAST monthly gets store elsewhere (basement or another closet). Get all that stuff off the counters. The coffee pot can stay, because, well, there’s nowhere else to put something you use every day. The knife set … outta there (put them in a drawer or a cupboard.) That stainless shelving unit? Gone (put it in the basement to hold all the stuff you’re going to clean out of your cupboards). Mount the paper towel holder somewhere else, maybe inside a cupboard door. Pair down your kitchen utensils, and either find a cute crock at Goodwill and spray paint it to match your new color scheme or paint what you have. Clean off that window sill. Pick one to three things that get to stay. The mixer .. in a cupboard or the basement. (can you tell I have a thing for clean counters?)
5. Treat yourself to a new light fixture. The big box stores have some nice options that aren’t too highly priced. If you have a Menard’s near you, it seems like their lighting is very well priced. Or, of course, Ikea, if that’s an option.
6. All that stuff on the wall? Gone. Make a charging area on the small counter where the coffeepot is and get all that paperwork out of there. If you absolutely have nowhere else for that, find a cute magazine rack that’s metal and full of character for that area.
7. Get a cute area rug for by the door. I’ve found that the polyproplene indoor/outdoor ones are super durable and they wash up perfectly in the washer or even with the hose. Definitely durable enough for the main entrance of the home.
8. Here’s the real treat: New laminate counters. If you can’t afford to do them all, do the main counter area, and leave the little area in the corner (where we’re making the charging station) and either paint it, or replace it with a different kind of counter, such as butcher block.
This is actually a very nice kitchen and doesn’t need much to make it super cozy. Most of what I mentioned doesn’t cost much, but it is pretty time consuming.
Can’t wait to see the after!
First thing – de-clutter, remove metal shelves, table & chairs, all decor, etc & see how the kitchen looks stripped down. Fridge in right spot? Seems to be blocking entry.
Based on photos, the kitchen looks like it needs lightening up, which to me would mean painting the cupboards either an off-white with clear lucite handles; or a pop colour based on a theme, like black & white; or bringing in the outside with a lovely green shade.
With existing budget, there would be enough for painting walls & cupboards, new handles & maybe a new ceiling fixture to bring the room up-to-date.
I would first remove all upper cabinets and put in shelves. Paint lower cabinets black. Remove the magazine rack from the kitchen. Remove table and put a stainless steel island (smallish) in the center (or off center) and use the dining room, if there is one; get a couple of small stools (metal) for the island. Change lighting fixture to something that makes her socks go up and down. Paint ceiling bright white, antique white for walls, especially so that colorful decorative items “pop”. And finally, some of those decorative metal looking backsplash tiles that Susan is so familiar with, for any place that is behind a sink, stove, etc.