I’d like to give a little shout out to the “man behind the hands” in many of my posts. Yes, it’s my husband Leigh. He is a great sport about helping me with various projects, and I thought you’d enjoy hearing from him directly about our refinished end tables. ~Susan
After looking for end tables at a number of furniture stores and not finding anything that we really liked, we decided to see if there was anything of interest at the local thrift store. My wife has some connections there and has been told that there are some real finds that might need a little TLC or are ready for an updated look. We took a trip to Make a Home Foundation, thrift store in Newtown, CT that also provides furnishing to returning veterans.

We wandered up and down aisles crowded with cabinets and tables, and finally came across a unique (and heavy) set of hexagonal end tables. They had a natural oak finish, with a slight milk washing on the sides. They were in pretty good shape: No major nicks or dents, and the only thing missing were the small brass knobs on the door, which were easily replaceable. The only real problem were the tops, which looked to be wood veneer. They were rough and faded from exposure to the sun, wine glasses and other items of destruction.
But the price was right. Only $50 each and we both agreed they had potential. I loaded them onto a dolly. These were solid wood and weighed around 50 lbs each, so it was no wonder no one had taken off with them. I loaded them into our van and headed home.
After unloading them and emptying out the sand (yes sand), I was able to make a quick assessment. Although the tops showed chipping varnish, sun damage and watermarks, there were no deep gouges, delaminating or areas of major discoloration.
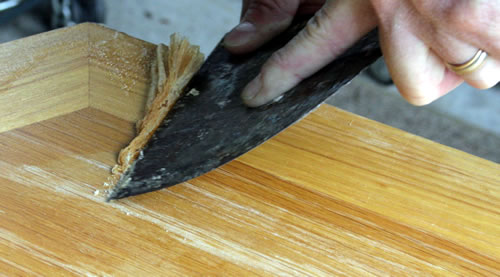
I decided to strip off what was left of the old varnish using a liquid stripper, thereby minimizing the sanding that would be needed. The old varnish came off quickly after only a couple of coats, revealing a really nice grain.

Notice that I used 5″ wide putty knife and did not use a steep angle, thereby reducing the possibility of gouging the top. You can see that the old varnish peeled off much like wax.

Next came the sanding. My goal was not to remove the grain, but simply to raise it enough to varnish. I started with a light sanding of 100 grit, but quickly moved to 220 then 400. There is no secret to the progression of these sandpaper grits, they are simply what I had in the shop. (Note from the editor – I was totally posing in this photo – he really did all the work ~Susan)

Next came the varnishing. I chose a satin polyurethane, which was consistent with the rest of the piece, and would offer a nice patina over time. I could’ve stopped at one coat, but two coats gave a slightly smoother finish and added more protection. Note how nice the unfinished wood grain turned out. All discoloration disappeared.

A quick trip to Lowe’s and we found replacement knobs that looked better than the original.

Here’s a pic in our living room. Notice that the satin finish doesn’t give off too much glare, and matches the rest of the piece.

Here they are in our living room.

This really made for a quick and easy weekend project, and brought two unique end tables back to life.
Thanks Leigh! Also, if anyone is interested in fly fishing, check out Leigh’s blog at www.FinFollower.com!


4 comments
Thanks Veronica – I’m hoping he’ll agree to write more!
Love this post. So cute to have you feature Leigh. Congrats to the newest star of Your Home, Only Better blog.