Thanks to everyone who lovingly nagged encouraged me to keep my word that I would redesign my hard-working laundry room closet!
I’m happy to report that just two weeks after I posted my embarrassing laundry closet in “My Laundry Closet Needs a Makeover”, I’ve transformed my closet from drab to fab – or at least fab enough that I don’t mind doing laundry quite so much! In fact, it only took a total of 5-6 hours to do and I got the whole family involved.
Remember what it looked like from my last post? (I still can’t believe I shared that picture – I hope my Mom didn’t see it!). Let’s get right to the before and after shots, then I’ll show you how we did it.
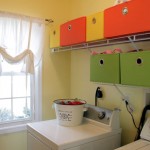
Drab…

…Fab!

But this story is actually more about organization than design. Let’s face it…it’s a blue closet without a lot of visual interest. But here’s what I gained:
- Use of wasted storage space for paper products and infrequently used items (very top shelf). Now my bathroom closet has a lot more room (yes, another reorganizing project in my future).
- Less clutter on the floor of the laundry room means it will be easier to keep it clean.
- Easier to find more frequently used items.
I think one of the MOST important things I gained is how this laundry space might appeal to a potential buyer compared to what was there before.
Pop Quiz! Can you guess how much was spent? (answer at bottom of post)
Behind the scenes:
First, I cleared the closet, and checked out the paint color (which also committed me to completing the project!). I have paint left over so if we ever move, I can finish the paint job behind the washer and dryer. I’d be too embarrassed to leave it like that for the new homeowner!

I’m sure my wonderful husband was secretly excited for an excuse to run to Home Depot on a Saturday night for supplies to build a simple shelf to go above the existing shelf. What a guy!

While I was busy painting the walls and trim, my daughter helped by painting the shelves. Proud mama!

Now laundry is more like life…Loads of Fun! (Ok, that might be a stretch).

Pop Quiz Answer (How much did I spend?): $70! That’s $30 for the shelf my husband added above the original, the paint was leftover from another room, and $40 for the turquoise/navy cloth bins I scored on the clearance end-caps at Target. {woot woot}
I may still add a storage cart between the washer and dryer, but quite honestly, I don’t think I need it. I’d like to keep it clean and simple.
Gotta run…washer just beeeeeeeped!
ps. I just realized that this is post #99. I feel like post #100 should be something very special. Any suggestions?
***Update 1.14.2011***
I’d like to give a shout out to Nicola, a YHOB reader to totally earned extra credit redesigning his wife’s laundry room. He took her from 12 to 21+ square feet! He added a magnetic board, cork board for notes, hooks, and whimsical signs and accessories. Take a peek! His wife is a lucky girl! 😉


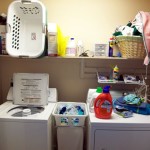

I love it! where did you get the small shelf that your detergent is on?? I’m short and need that to store things on my level!! thanks!
Kim
Love your laundry area. I’m totally inspired. Your laundry area is exactly like mine, but I didn’t think about adding another shelf and using the area for storage. I do have a tip for you, however. In my closet area, I hung PVC pipe from planter hooks (and rope) from the ceiling. It makes a lightweight hanging rod for my clothes when they come out of the dryer. I just put them on hangers when I take them out.
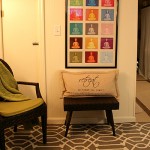
Love the quote above the doors! The space looks great and efficient…congrats on the accomplisment
We have the same exact size space for our wash closet. My hubby is going to put in something similar! Thanks for the color inspiration!
I love, love it. The cheerful blue pops. The baskets are too cute. Fabulous job!
Warmly, ~Melissa 🙂
I love that it was a family effort. It’s so pretty now, and the vinyl saying says it all! You must be loving all the extra space!
Wow! I Love it!
How precious is your family to pitch in and help. 🙂
I agree that it will be a plus for future home buyers. Our house if for sale right now, and I think my organizing the place will help it be more appealing. 🙂
Great idea to add that extra shelf! Such a great use of space.
Thanks for joining my party!
I think it is awesome! And since laundry is one of those tasks that is never done… what a nice place to visit over and over again!
i really like the color you painted it! i think it definitely makes laundry look more fun 🙂
It looks great! Its amazing what a coat of paint & some organization items can do for a space! I love the clearance cloth bins you scored at Target! They look great & go really well with your paint color!
I love your blue room! It’s so cheery and looks so organized! I love organizing and that room must make laundry more fun – anything to make it more fun!
Becky B.
http://www.organizingmadefun.blogspot.com
Organizing Made Fun
First time visitor here. (I’ll be back for sure) My laundry room is even smaller! What you have done will work and finally I have some inspiration for the other posts too to take care of the last unpainted room in our major renovations. You can still see the plaster swipes on the sheet rock for goodness sake! Thanks a bunch!
Blessings, Linda @ bushel and a pickle
.-= Linda´s last blog ..Daughters of the King… Part 2 =-.
Hi Bridget – great ideas! I think I’d add casters to the bottom of the bin – I like to be able to roll them right up to the washer. 🙂
Hi
I love how neat & organized it is now. I have a suggestion for your hamper in the hall dilema. What if you find a 2nd hand small dresser, remove the drawers, have handy hubby reinforce interior if needed. Paint or finish to your taste. Paint interior in contrasting color, and finally find more decorative canvas or woven / hamper baskets to place inside. This way it looks like furniture but serves the space very well. If you don’t want to invest all that time & work, I have another idea,I see that you blog for home goods. What about the devorative wooden painted hampers I see there all the time. I bought my daughter a black one for her dorm & it looks like an end table. Maybe you could place 2 or 3 side by side for your laundry sorting. The portable style hamper has to go! Sorry.
Hey there Kansas Amy – nice to meet you!
I’m LOL because I found myself doing laundry tonight (just folded the last load) way past my ET bedtime – but I still smile when I peek inside my laundry closet. Perhaps I should get out more! 😉
Just what I needed, some laundry room inspiration. It turned out great!
.-= Kansas Amy´s last blog ..Home Depot Garden Club =-.
Now don’t go giving him a big head! lol How funny that owning 3 laundry baskets make you a grown up – who knew! Actually, I also use those for toting accessories when staging. I think they’re easier to carry than plastic bins.
Oh, well done, this is lovely! The colored cloth bins really make the space and I’m so impressed you own 3(?) laundry baskets – that’s so grown up!
The quote is wonderfully tongue in cheek but the star of the show is definitely your husband – he should consider himself publicly thanked!
Oh Gina – you’re not taking the bait this time! lol
Thanks Cathy – fresh & clean works for me! 🙂
Susan,
Very nice! You did a great job with this project & I look forward to your 100th post! Kepp up the good work:) BTW, the blue paint looks fresh & clean! Cathy
LOVE IT Susan! Now I am feeling laundry room envy. I know that with additional shelving I too could have so much more needed organizing space. You have inspired me once again…BUT NO…I will not be posting my before shots…well not for a little while. Great job!
xo,
gina